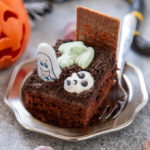
Chocolate Graveyard Cake
Let the kids go to town with Halloween themed decorations and create your very own delicious Graveyard Cake with a rich chocolate cake base, chocolate frosting and Oreo soil!
Servings 20
Ingredients
- For the cake:
- 2 sticks (226g) unsalted butter/margarine, at room temperature*
- 1 ½ cups (300g) caster sugar
- 3 large eggs
- 2 tsp vanilla extract
- 2 cups (280g) plain flour
- ¾ cup (75g) cocoa powder, sifted
- 1 tbsp baking powder
- Pinch of salt, only if using unsalted butter
- ½ cup (120ml) milk
- For the topping/decorations:
- 14-16 oz (400-450g) chocolate frosting, either homemade or store bought. (I used store bought Chocolate fudge frosting)
- 1 ½ cups (180g) crushed Oreo’s, or other chocolate sandwich cookie
- 6-8 rectangular chocolate covered biscuits
- Red or white writing icing
- Chocolate fingers, optional (for a fence around the edge of the cake - I ended up not using them)
- A mixture of Halloween sweets; I used spiders, pumpkins, gargoyles, witches, ghosts, skeletons! I used a mixture of jelly sweets and chocolate, so use whatever you want!
Instructions
- Preheat the oven to 180C/350F and grease a 10 inch square pan. I used a loose bottom one as I find them easier to use.
- Place the butter/marg and sugar into a large bowl, or the bowl of your stand mixer and beat until light and fluffy, around 2 minutes.
- Add in the eggs and vanilla extract, scraping down the sides as necessary, and mix until well incorporated; around 1 minute.
- Add in the flour, cocoa powder, baking powder and salt (if using) and mix on low until the mixture begins to come together, then add in the milk and continue mixing until everything is well combined and smooth.
- Tip into your prepared pan and smooth over with the back of a spoon/spatula and place in the oven for 25-30 minutes, until risen and an inserted skewer into the centre comes out clean.
- Leave to cool in the pan completely.
- Once cool, remove from pan and place on a plate/cake board.
- Using a small angled spatula, spread the frosting into an even layer over the top of the cake. If you’re going to add a fence, keep around 2oz/50g of the frosting to stick the chocolate fingers onto the side of the cake.
- Spoon the crushed Oreo’s over the frosting and press lightly to stick them to the frosting. Then sprinkle a little more on top, so that the finished soil doesn’t look too flat or neat!
- Now it’s time to decorate: I piped “RIP” onto each rectangular biscuit in red writing icing (you can use white) and then pressed them into the cake in no particular order. You can line them up, but I liked the fact they were random.
- After that, I just positioned all of the other jelly sweets and chocolates randomly over the top until you have your graveyard covered in all kinds of Ghoulies!
- To add a fence to your graveyard: Using normal sized or mini Chocolate fingers (or a mixture of both) – place a little chocolate frosting on the flat side of each finger and then press lightly to the side of the cake, leaving a ½ inch gap between each finger!
- Easily serves 20 people, I sliced it into small squares and each square had a couple of sweets/chocolates on each one.
- Graveyard Cake will keep in an airtight container, at room temperature for 4 days, or covered with cling film as a whole cake for 3 days.
Notes
*I prefer how margarine makes this cake taste, but you can use unsalted butter and then add a pinch of salt if you prefer.