Chocolate Honeycomb Cheesecake
This no-bake Chocolate Honeycomb Cheesecake is packed with tiny morsels of crunchy honeycomb inside a velvety smooth cheesecake. With a simple biscuit base and homemade honeycomb garnish, this dessert is a showstopper that doesn't take forever to make!
Ingredients
- For the base:
- 2 1/2 cups (300g) crushed digestive biscuits/graham crackers, measured AFTER crushing
- 1 stick (113g) unsalted butter, melted and slightly cooled
- For the cheesecake:
- 14 oz (400g) full fat cream cheese
- 3/4 cup (180ml) double cream
- 1/4 cup (70g) caramel sauce; you want quite a thin sauce
- 1 cup (120g) icing sugar, sifted
- 1 tsp vanilla extract
- 3/4 cup (150g) chocolate covered honeycomb pieces
- 3 oz (85g) milk chocolate, melted
- For the honeycomb:
- 1/2 cup (100g) caster sugar
- 3 tbsp golden syrup
- 1 tsp bicarbonate of soda
Instructions
- Grease and line a 9 inch round spring-form cake tin. Place biscuit crumbs into a medium sized bowl and pour the melted butter over the crumbs.
- Mix until all the crumbs are covered in butter, then tip into your greased pan and press into the pan until you have a level biscuit layer. Place in the fridge, whilst you make the cheesecake.
- Place the cream cheese, double cream, caramel sauce, icing sugar and vanilla extract into a large bowl, or the bowl of your stand mixer and beat until light and smooth, about 2 minutes on med-high speed.
- Add in the chocolate covered honeycomb pieces and fold in by hand.
- Take your chilled base out of the fridge and then pour your cheesecake filling over the top. Smooth until level with a small, angled spatula.
- Place in the fridge for around 4 hours, until firm. (Cheesecake will not set hard, it will be slightly firm to the touch, but still soft if you press really hard into it!)
- Whilst the cheesecake is chilling, make the honeycomb: Line a baking tray with greaseproof paper and leave to one side.
- Place the sugar and golden syrup into a medium sized saucepan, over a low heat. Stir occasionally until the sugar dissolves and the mixture starts to get runny. Then stop stirring.
- Once the mixture starts bubbling around the edges, turn the heat up to high and boil until golden - this will take about 5 minutes. Lift the pan and give it a swirl every so often to stop it burning, but DO NOT stir.
- Once the entire mixture is golden yellow (don't let it get dark and caramel coloured, this is overdone.), remove from heat and add in bicarbonate of soda immediately. Mixture will froth up very quickly and then settle. Once the bicarb has dissolved, the mixture will stop expanding. Pour it onto your lined baking tray and leave to set completely.
- Once set, break into shards and leave to one side whilst you finish off the cheesecake.
- Remove cheesecake from the fridge and place melted chocolate into a squeezy bottle or small Ziploc bag, with the corner snipped off.
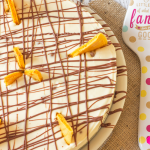
- Drizzle chocolate all over the top of your cheesecake, however you like, I did lines vertically and horizontally over mine.
- Take small shards of honeycomb and place around the edge of your cheesecake and in the centre, however many pieces you want, I used 5 around the edge and 3 smaller pieces in the centre, but it's completely up to you!
- Place back into the fridge until ready to serve.
- Cheesecake will keep covered, in the fridge for 3 days.
Notes
Recipe by Annie of Annie's Noms